How to take thrift store finds and paint them to create a simple and inexpensive Halloween mantel.
The kids have been sick for the past few days. It started on Saturday, and ever since, two of the three have been sick. Only the two of three have been rotating between the kids and just when I think one is feeling better, the next day they are sick and one of the others is feeling better. It's crazy.
So while I'm stuck at home with sick kids I've been using this time to decorate for Halloween … you know, in an attempt to avoid the housework.
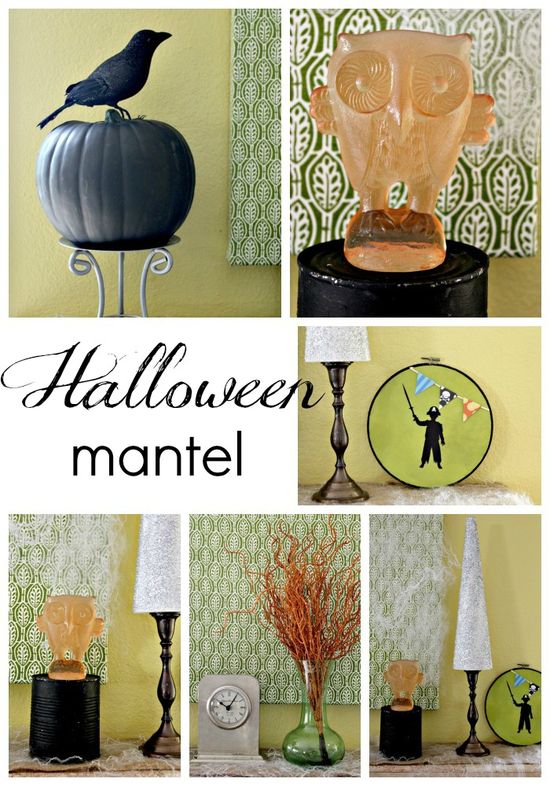
Here's a peek at our mantel:
We don't tend to decorate the whole house, I have key areas that I like to work on; our dining room, fireplace/mantel, and outside. I also prefer to go the simple route, as opposed to over the top and themed, this makes it easy to mix and match pieces with other holidays and occasions. You may have already seen our dining table, which looks like that day in and day out and will be changed over to Fall decor after Halloween, which will stay up until after Thanksgiving, then switched to Christmas decor after that.
I don't want our decor to look the same each year, I like to mix it up so the kids are always surprised, and I like to build on our collection each year without spending a lot of money. This means I'm always on the lookout for basic items that can be mixed and matched between the holidays, and of course, I upcycle previous years decor too.
You may notice that I always have the same green backdrop above our mantel. It is simply a piece of fabric that I stretched around a canvas that blends in perfectly no matter the season. I also use a lot of basic candle holders and like to use a lot of silver because that can be used for other occasions as well, such as using our silver pumpkins for both a Cinderella party and for Fall and Halloween table decor.
For this years Halloween mantel I purchased 2 new items and then re-used old items as well as upcycling others.
Let's work our way around the image above.
- Black glitter crow – this was a new purchase from Michael's craft store, it was $9.99 but I bought it for 50% off.
- Black pumpkin – I painted a fake pumpkin back in 2008 to look like a cat, you can see it in the garden in these Halloween photos. It is sitting on a candle holder that we have had for years.
- Orange owl – See below for the details on how this orange owl came to be. It is sitting on a tin can that is painted black.
- Embroidery hoop silhouette – I made this fun pirate silhouette of Flynn last year, you can view the tutorial by clicking on the link.
- Silver glitter tree – This tree was part of a collection of Christmas trees I made last year. I thought it would be fun to pull out this one again for Halloween too. It's sitting on top of a candlestick holder I found hiding in my candle cabinet.
- Clock – This clock is perfect for any and every occasion and sits on our mantel all the time. I found it on clearance at Target quite a while ago.
- Burlap and Spiderweb runners – I keep a burlap runner on the mantel all the time, it's easy to shake the dust off and like the clock and canvas wall hanging go with every occasion. For Halloween, though I added a few spider webs over the top of it and a couple of plastic spiders.
- Green vase and orange glitter branches – The green vase also normally sits on our mantel. When there isn't a holiday to decorate, it is clustered with a variety of colored glass vases, but for Halloween, I popped in three orange glittered branches that I found at Michael's craft store for 99 cents each.
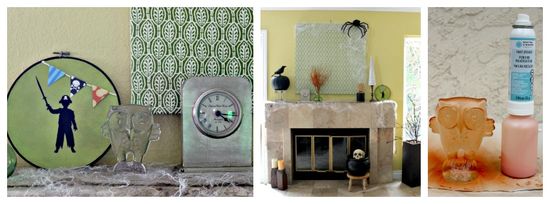
- You will notice a few other items in the photo below such as a large spider (hanging on a spider web draped over the wall hanging) which has been a part of our Halloween decor since 2008, and a cauldron that we have had since about 2007 (maybe longer). The skull inside the cauldron is propped up with an old broken black glittered spider web, last year it was in our garden outside. It's hard to tell in the small image, but the branches in the tall umbrella stand next to the fireplace are lighted Halloween branches that last year we had put outside by our walkway.
Now for the details on the orange owl. A few months ago I came across a glass owl at one of my favorite local resale stores Treasures and Beyond. I adore owls and plan on keeping this one on the mantel all the time. It definitely needed a pop of color though.
This was a matter of trial and error, with a lot of error before I finally got it right.
Tips for painting a glass ornament:
- Use Martha Stewart glass paint. It's really easy to work with. To paint a glass ornament that still appears clear you will need Martha Stewart Glass Paint 'Gloss Transparent' which comes in an assortment of colors. You will also need the Martha Stewart Glass Spray Paint Kit, which comes with very simple instructions on how to use it.
- Clean your ornament with rubbing alcohol before painting.
- Do not spray a thick coat of paint especially if you have an ornament that has a lot of detail such as this owl. The paint will run a little and will collect in ridges and bumps making dark patches.
- Spray a very light coat of paint. Dry (until touch dry) with a hairdryer on a low, warm setting. This particular project took about 8 light coats until I was happy with the color.
- Air dry for 21 days to ensure the painted has cured properly.


