Do your kids love adorable monsters like mine do? Come over to Rusty and Rosy where we are getting our monster groove on with some Dancing, Reading and Writing with the Boogie Monster.
Posted in Activities for Kids, Book Party, Books, Cake Pops, Crafts, Crafts for Kids, Homeschool, Monster Party, Painted Projects, Wood | Permalink | Comments (1) | TrackBack (0)
Digg This
| Save to del.icio.us
|
|
Over the years I have been adding to Marisol's kitchen set. We bought her a sweet Kidcraft pink kitchen when she was 2 (so about 3 years ago). Each year since I've given her new accessories to build on the basic set so she never tires of it. And she hasn't. She loves having tea parties for her dolls, and for us, and is often in her bedroom whipping up something fabulous.
For Christmas I had planned on giving her a small rack with some more wooden food items but time got away from me and although I had picked up a fabulous towel holder with shelf above it for only $1.99 at Goodwill, I didn't seem to have enough time to get it sanded and painted. So today, she got a belated Christmas gift.
This was the towel rail with shelf that I purchased ... fabulous deal for $1.99.
After a lot of sanding, applying a sealer, and three coats of paint, it was looking lovely, but needed a little something extra. So I painted the towel rail silver to match the silver on her kitchen and then cut pieces of scrapbook paper and attached them to each section of the shelf using mod podge, you can see the subtle pattern in the second photo below.
She was thrilled with the results. I loved the addition of the tea towel, which although was a little expensive at $5.99 from Marshalls, was just perfect and I couldn't resist giving it to her.
I can't wait to finish decorating her bedroom and share photographs. It seems to be a long process though.
This post linked to:
I'm over at Kidzui today sharing how to make this fun Sleigh Bell Christmas Wand. A perfect last minute stocking stuffer.
Posted in Christmas, Crafts, Crafts for Kids, Wood | Permalink | Comments (0) | TrackBack (0)
Digg This
| Save to del.icio.us
|
|
I caught Marisol raiding my stash of ribbons a number of times over the past couple of days. She'd been twirling them and gathering bunches of them in her hands, dragging them all over the house.
So I decided to make a couple of these
I had quite a few wooden dowel rods in my cake decorating kit and the wooden beads were left over from our recent Wood Crafts Kit projects. The ribbon was from my craft room stash.
These are very quick and easy to make. Cut three ribbons in different colors to the same length. Tie them onto the wood dowel rods. Put the end of the rod into the bead, using hot glue to secure it - this will stop the ribbons from sliding off the end of the rod.
Whether it was inside or outside, the kids had so much fun with these today. They made up games such as taking it turns to be the leader when running around in circles; one would lay their ribbons along the floor for the other to jump over, and they would wave them like a flag to start a race.
So if you are looking for a quick and easy craft to do with the kids this summer that will keep them entertained for at least an hour or two at a time, give this a go.
These would also make fabulous party favors.
Posted in Crafts, Party Favors, School Vacation Activities, Summer Break Activities, Wood | Permalink | Comments (1) | TrackBack (0)
Digg This
| Save to del.icio.us
|
|
I was recently asked to host an Elmer's X-TREME craft party at my house. My mission, should I choose to accept it, was to build bird houses using wood, and after I accepted my mission, I was advised that a mystery product also needed to be used, and I could choose glitter or buttons.
Pre-party I attempted to build a bird house for the first time out of popsicle sticks and an hour later still not being finished I realized that this plan had disaster written all over it. Afterall, I had invited 4 and 5 year old children over. Short attention spans coupled with fiddly work was not going to be a good mix for them. So a quick revision of my plan and a quick 30 minute project later and this is what I came up with instead:
So once our plan was in place, Marisol and I hit the ground running for craft supplies and food for our party.
THE FOOD:
Sticking with the orange, white and blue theme of Elmer's, I had a blast coming up with food for the party:
THE CRAFT PROJECT:
After lunch and playing outside, we settled indoors to do the craft project. Hubby extended our new dining room table and we placed a plastic tablecloth down to protect it, hung the bird feeder that I had made from the light and then lined up lots of little gift boxes for all of the children containing all of the supplies they would need to make their project.
The gift boxes contained:
To make the bird feeder:
All of our little friends took their bird feeders home to paint them and fill with seed. Marisol and Flynn finished theirs after the party but they are yet to be hung outside. First I need to track down that outdoor varnish. Let the unpacking of more boxes proceed ....
AS SEEN ON:
Disclosure: This project has been compensated as part of a craft recipe project using Elmer's #collectivebias #xtremeschoolglue #gluenglitter
Posted in Activities for Kids, Craft Kits, Craft Party, Crafts, Crafts for Kids, Orange and Blue Party, Paid Posts, Painted Projects, Parties, Party Activities, Rainy Day Activities, School Vacation Activities, Summer Break Activities, Wood | Permalink | Comments (13) | TrackBack (0)
Digg This
| Save to del.icio.us
|
|
UPDATE: This giveaway has ended. The two winners chosen via random.org were Secret Mommy and Bridget.
************************************
It's summer and we are all looking for ways to entertain our little ones over this long vacation time. I'll be bringing you lots of fabulous ideas over the coming weeks, that are not only practical but are sure to keep those little fingers and minds busy.
First up, I was asked to review and host a giveaway for the Creativity For Kids Classic Wood Crafts kit. I'm sure you all know of my love for Creativity For Kids products, they are of great quality and each of the kits I've received from them has been put to great practical use, as opposed to some other craft kits, which are just that ... crafts. You know the ones, you wonder what on earth you are going to do with them once the kids have made them.
Anyway, I immediately agreed to do the review and giveaway because, well it's wood and I love wood crafts (my dad is a woodcarver by trade - did you know that?). I knew that I had already received the kit from them previously though when I was working as a Creativity For Kids Ambassador, but with moving, it had been packed up into boxes and was already at the new house when they had contacted me, so I had them send another thinking it could take me weeks to find the first kit. Well low and behold, whilst I was rummaging in boxes to find my box of clay to use for one of the ideas I'd had, I came across the original kit. So then my ideas broadened and the kids and I set to work making a variety of projects. I think that this has been one of their favorite kits so far as there are endless possibilities.
While I was working at my computer one morning, I found Flynn doing this:
Without any instruction or direction from me, my alphabet obsessed boy decided to turn the various popsicle sticks into letters of the alphabet. Imagine using this as a learning tool. Give your child words to spell, or even simple math problems. What a great homeschooling tool.
I wanted my ideas for this kit to be 'out of the box', because when you look at the packaging there really are a ton of ideas on there already, so I wanted to come up with something a little different to show you how many more ideas are out there.
Marisol came up with the next craft project. She saw the beads in the box and immediately wanted to make jewelry. So I set her up with the eco-friendly paints and a handful of beads and she got to work painting them.
Next, it was my turn to come up with a craft project.
When we moved into our house last week we discovered that AT&T U-Verse has a Barbie Channel. Marisol was hooked. They have a memory matching game on there where you have to turn over 2 matching game pieces and it eventually makes a puzzle. So naturally I decided to make a matching game for the kids. They are at the perfect age for games and puzzles and do them every day at home. Marisol is the Bingo champion. She really is. Of course though I don't have my box of stamps here to stamp the little wooden discs I wanted to use (they are arriving on the next truck with more of my craft room supplies). So I decided to make stamps first.
My idea was to glue some clay to the top of the wooden blocks and imprint an image in each which when stamped would re-create it. I couldn't find my box of clay though, but did have packets of Model Magic on hand, so willing to try anything out, I gave it a whirl. Keep in mind that Model Magic takes 72 hours to air dry, but it makes for a fun little project.
To make these stamps, roll a small ball of Model Magic and attach it with a little of the glue provided in the Classic Wood Crafts kit onto the wood block. Then very gently with your finger, flatten the ball out, the glue will spread across the block at the same time to ensure that it attaches evenly. Next, imprint each one with an image, words or numbers. I used a number of different items to make the imprints - small items from my daughters dolls house, lego pieces, buttons, fondant cutters and I even bought a little $1 stamp kit from Michaels to make a cute bird imprint on one.
I put these aside to harden and then purchased a few assorted $1 mini stamp pads from Michaels. Once they were firm, I stamped each of the wooden discs to make matching game pieces. You can keep building on this collection to make the game harder for the kids. The Classic Wood Crafts kit also comes with a black marker, so I used this to add detail to a couple of the discs (a leaf for the apple and a eye for the bird).
And the game? Was a big hit with the kids. They even took it in turns to turn over and re-arrange the discs for the other one to play the game.
Again, in keeping with my theme of making practical crafts that we could use, and Marisol seeing that we could make flowers (there's a picture on the box), I suggested to her that we make a banner for her bedroom. She loved this idea. So I asked her to choose a few colors and then paint each of the petals and center circles. Of course she decided that she wanted to paint some of her flowers orange, and there was no orange in the paint supplied, but that was easily fixed as I mixed a little red and white into the yellow tub. She was thrilled.
Once the paint was dry, I glued the flowers together and again set them aside to dry. Now I had to figure out how to turn these into a banner. There was a lovely green cord in the box so I knew I wanted to use that (you know, as if it were a stem for the flowers), but after a couple of failed attempts, I finally realized I could re-use the corrugated cardboard from the box, so I cut circles out of it and then glued them to the back of each flower with the cord running through the center. It worked perfectly.
Then once set completely, we hung her pretty banner onto her bed. She loves it.
AND NOW I HAVE A GIVEAWAY TO SHARE
Would you like your own Classic Wood Crafts kit?
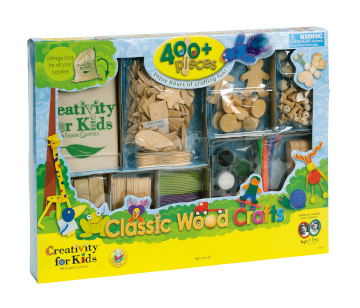
It's simple to enter. Answer this question in the comments:
What would you like to make with this kit?
This giveaway is open to all residents of the US over the age of 18 and ends on Monday June 13th at 10pm PST. TWO winners will be drawn via random.org.
Creativity For Kids are on Facebook and Twitter. Follow them to keep up with all the latest news.
Disclosure: I received a Classic Wood Crafts kit to review.
We are gearing up to move house in a couple of days, and in an effort to pare down our household goods I have been de-cluttering, donating and recycling. You may remember that in an attempt prevent our house from becoming over-run with artwork from the kids I started photographing it and having hard-cover coffee table style books made. Well I hadn't done this with any of Jay's artwork yet, and there were boxes of it stored in the garage, so one day I sat down with my camera, photographed all of the pieces I absolutely loved, then recycled 95% of it. Marisol was helping me sort through it all when she came upon a clock Jay had made when he was little.
The twins immediately wanted to play with it, thus a little arguing ensued as they debated on who could play first, and second, and so on.
So I suggested that they make clocks of their own. They are very interested in learning to tell the time. Every night they check the clock to see when it is their bedtime and again in the mornings before school.
We shopped for a few supplies at Walmart and Michaels and then set to work making their very own clocks.
To make:
Have the kids paint the large circle and set aside to dry. While it is drying have them stamp the numbers for the clock onto the small wooden circles.
Once the large painted circle has dried, attach the smaller wood circles to it using the X-TREME glue. Now cut the clock hands out of card stock and attach using a thumb tack. Make sure you donn't push the thumb tack in all the way though because you want the hands to be able to move.
Now they have their own clocks to use as they learn to tell time and for when they are role-playing.
Some fun role-playing and time-related activities include:
Disclosure: This #xtremeschoolglue project has been compensated as part of a craft recipe project using Elmer's #collectivebias #gluenglitter
My husband is the grill master. No really, he is. Although I must admit, I'm becoming pretty grill savvy on my little George Foreman.
Father's Day is just around the corner, so the kids and I painted a special sign to hang behind dad's grill as his gift.
The full tutorial on how to make this can be found on my post at Multiples and More (where I am the monthly craft contributor).
As seen on:
Posted in Crafts, Father's Day, Food: Crafts, Gift Guide: Men, Hand-made Gifts, Wood | Permalink | Comments (1) | TrackBack (0)
Digg This
| Save to del.icio.us
|
|
UPDATE PART 2: My Jewelry Organizer won the Elmer's Spring Creation Contest. I'm absolutely thrilled. Aside from receiving a visa gift card for winning, I also had the privilege of drawing 3 more winners from the comments via random.org to each receive an Elmer's DIY kit. The winners were: April, Barbara (VinoLuci), and Bestie.
UPDATED: This giveaway has closed. The winners as drawn by random.org are wendyp, JulieB and Miranda Taylor. You will all be receiving emails from me shortly.
**********************
Remember when I made the jewelry organizer for Marisol's bedroom? Well, recently I received an email from Elmer's reminding me about it being that time of the year for spring cleaning, organizing and make overs and they wanted to challenge me to create something either on my own or using their Spring Creation Guide as part of an Elmer's Spring Creation Contest. The only stipulation being that I had to use their newly improved Glue-All.
I'm always up for a good challenge, especially when it comes to crafting and decorating so I happily accepted and set to work making this:
Cause, mama didn't have a pretty jewelry organizer, and instead her jewelry looked a little like this:
Yes, I'm hiding my head in shame. Terrible isn't it.
In my head I knew how I wanted to organize it, but it was a matter of finding the right supplies. I briefly considered picking up a few drawer organizers that I had seen at my local craft store and sticking them together, but the thought of spending over $20 per organizer was not going to be a cost effective way to tackle this so I decided to hit up my local antique mall to see what I could find. Tucked away in a corner, I found this fabulous type set tray for only $15.
But it obviously needed a lot of work. First order of business was to break out that Glue-All and set to work making repairs to the cracks and sections that needed to be stuck down again.
Next up was to cut a piece of wood using my X-Acto knife to the length of the tray to attach to the top with Glue-All, I also re-inforced it with a couple of nails.
Now we are onto the fun part. I wanted to keep with the antique feel of this type set tray so thought I would try my hand at creating a cracked finish. I've never done this before, but it was actually much easier than I thought, albeit a little time consuming.
Step 1: Apply a sealer to the wood. Set aside to dry.
Step 2: Apply your first color - I used walnut. Again, let it dry.
Step 3: Apply the crackle. Don't dry completely, but allow it to dry enough that it becomes tacky.
Step 4: Apply a second color of paint - I used coral. Within minutes you will see the cracks starting to appear. By the time the paint is dry, it looks fabulous.
Step 5: Apply a varnish.
The final step is to attach hooks and whatever else you want to hang your jewelery. I opted for a few different items: hooks, eye screws and some decorative rings.
And now you have a beautiful space to hang all of your jewelry.
************************
And now I have something for you too. A GIVEAWAY!
3 winners will each receive an Elmer's Spring DIY Kit containing:
Just answer this question to enter:
What needs a Spring makeover in your home?
Leave your comment below and please ensure that I have a way of contacting you if you are one of the three winners.
This giveaway is open to all residents of the United States over the age of 18 and expires on Thursday May 12, 2011 at 10pm PST.
This post linked to:
AS SEEN ON:
The Spunky Diva ... Newly Woodwards ... Tip Junkie ... Creative Jewish Mom ... The Vintage Pearl ... Pretty Parade ... Pretty Zoo ... Rookie Moms ... Indie Craft Parade ... At Home with Kim Vallee ... A Typical Type A ... The Home of Brit
Disclosure: I recieved an Elmer's Spring DIY kit and compensation to purchase other products needed for this project.
Posted in Crafts, Decorating, Giveaways, Organizing Tips, Paid Posts, Painted Projects, Re-use / Recycle / Upcycle / Green, Reviews, Wood | Permalink | Comments (49) | TrackBack (0)
Digg This
| Save to del.icio.us
|
|
Looking for an Easter craft to do with all of those egg cartons that you hoard? I have just the thing.
Easter Checkers.
This is what you will need to make this fun Easter game for the kids:
To make the bunnies:
Paint the egg cups with the matte pink, once dry, paint a second coat using the metallic paint. Cut out ears from the glitter card stock, attach the center using the mini glue spots. Poke a hole in the top of the egg cup with the X-Acto knife and insert the ears, attach to the inside of the egg cup using the mini glue spots. Attach the pom pom tail using the medium glue spots and the wiggly eyes using the mini glue spots. Draw on the rest of the facial features using a permanent marker.
To make the chicks:
As per the instructions for the bunnies. Substitute pink paint for yellow. Attach the wings using the medium glue spots and the fuzzy top exactly the same way as you did the bunny ears. Fold a piece of orange card stock in half, cut out small triangles (beak) and attach using mini glue spots.
Now play, play, PLAY!
AS SEEN ON:
This post linked to:
Disclosure: This project has been compensated as part of a social shopper insights study for #collectivebias ( #gluenglitter )
Posted in Activities for Kids, Crafts, Crafts for Kids, Easter, Food: Crafts, Games, Gift Guide: Kids, Hand-made Gifts, Holidays, Paid Posts, Party Activities, Rainy Day Activities, Re-use / Recycle / Upcycle / Green, School Vacation Activities, Summer Break Activities, Wood | Permalink | Comments (21) | TrackBack (0)
Digg This
| Save to del.icio.us
|
|
www.flickr.com
|


