
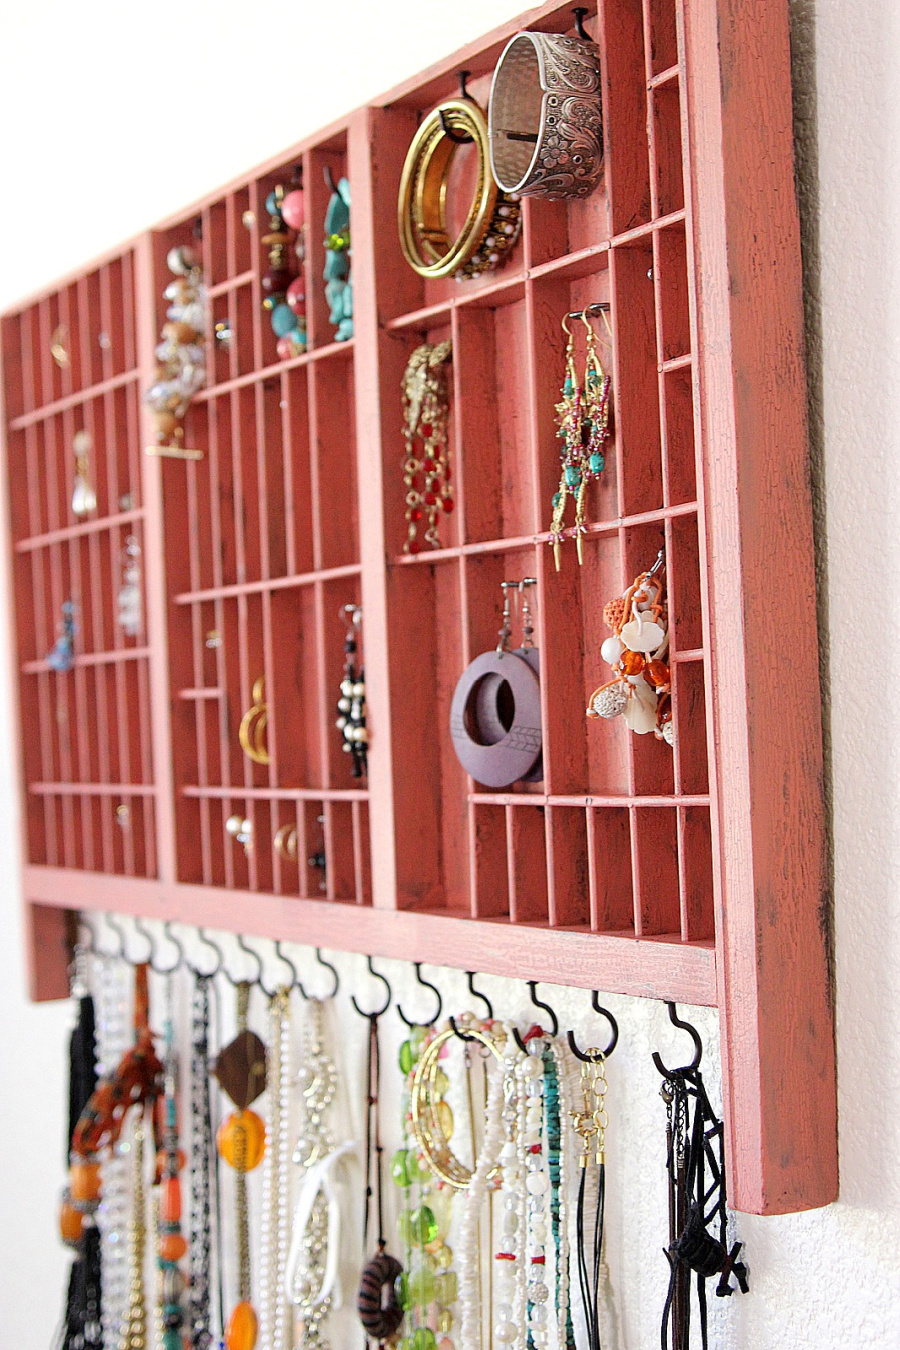
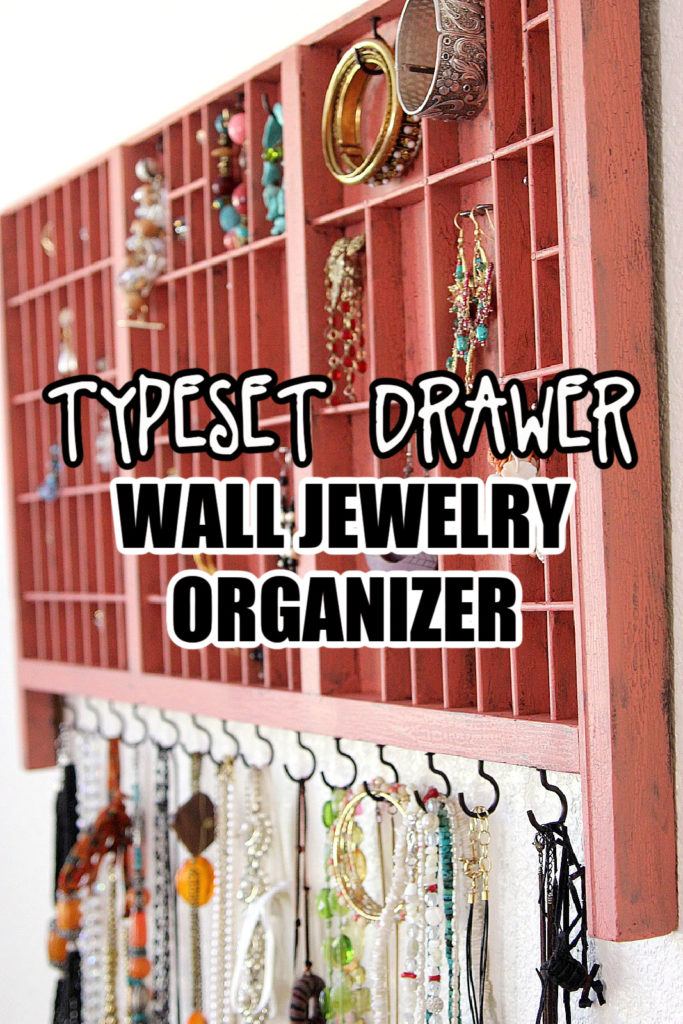
Re-purpose a typeset drawer and transform it into a DIY wall jewelry organizer to keep all of your favorite pieces visible and organized.
Disclosure: I received an Elmer’s Spring DIY kit and compensation to purchase other products needed for this project.
UPDATE PART 2: My Jewelry Organizer won the Elmer’s Spring Creation Contest. I’m absolutely thrilled. Aside from receiving a visa gift card for winning, I also had the privilege of drawing 3 more winners from the comments via random.org to each receive an Elmer’s DIY kit.
Remember when I made the jewelry organizer for Marisol’s bedroom? I recently received an email from Elmer’s reminding me about it being that time of the year for spring cleaning, organizing, and makeovers. They wanted to challenge me to create something either on my own or using their Spring Creation Guide as part of an Elmer’s Spring Creation Contest. The only stipulation being that I had to use their newly improved Glue-All.
I’m always up for a good challenge, especially when it comes to DIY projects so I happily accepted and set to work making this:
I didn’t have a pretty jewelry organizer like my daughter, instead, my jewelry looked a little like this:
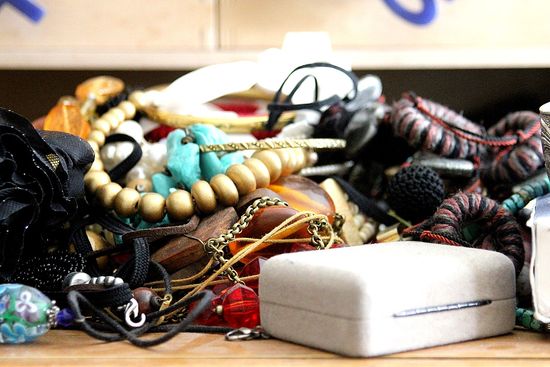
Yes, I’m hiding my head in shame. Terrible isn’t it.
DIY wall jewelry organizer
Supplies
- Printer’s typeset drawer
- Elmer’s Glue-All
- Wood sealer
- Paint (in 2 colors) and a paintbrush
- Crackle
- Varnish
- Hooks, eye-screws, and small decorative holders
Instructions
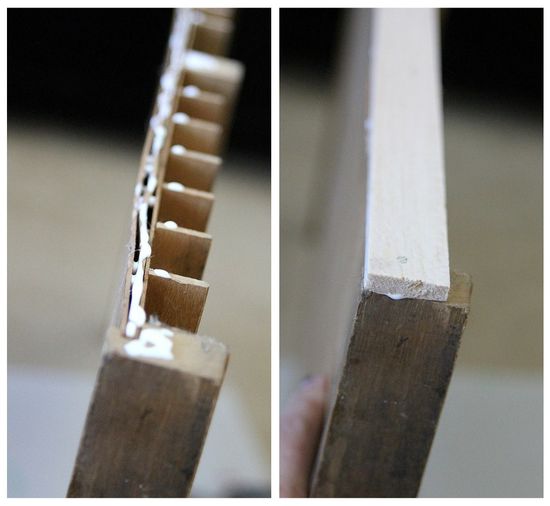
In my head, I knew how I wanted to organize it, but it was a matter of finding the right supplies. I briefly considered picking up a few drawer organizers that I had seen at my local craft store and sticking them together, but the thought of spending over $20 per organizer was not going to be a cost-effective way to tackle this so I decided to hit up my local antique mall to see what I could find. Tucked away in a corner, I found this fabulous typeset drawer for only $15.
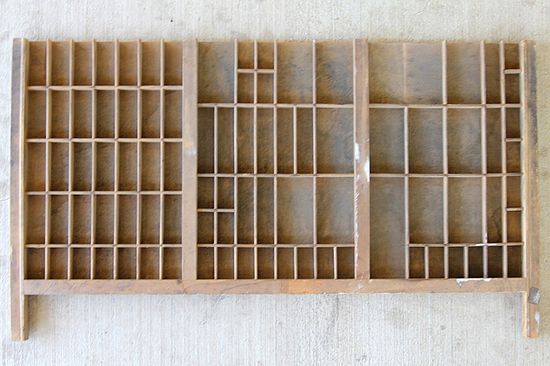
It obviously needed a lot of work. The first order of business was to break out that Glue-All and set to work making repairs to the cracks and sections that needed to be stuck down again.
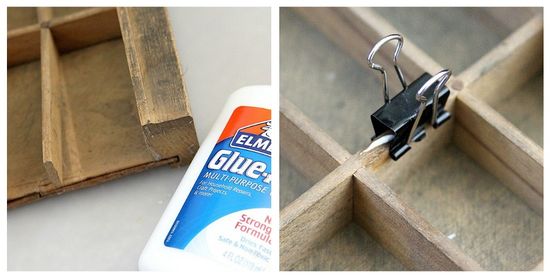
Next up was to cut a piece of wood using my X-Acto knife to the length of the tray to attach to the top with Glue-All, I also reinforced it with a couple of nails.
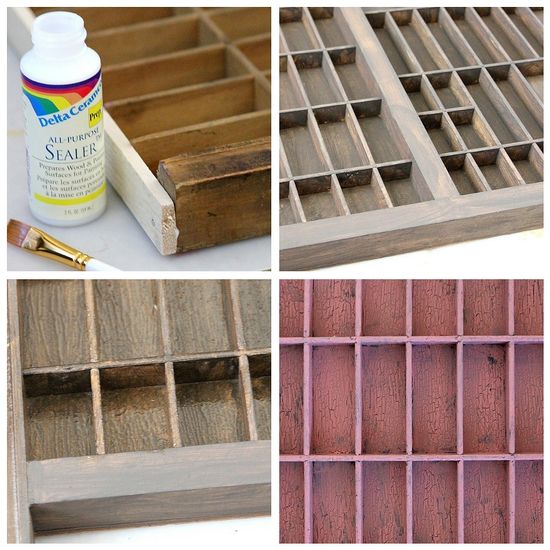
Crackle effect paint
Now we are onto the fun part. I wanted to keep with the antique feel of this typeset drawer so thought I would try my hand at creating a cracked finish. I’ve never done this before, but it was actually much easier than I thought, albeit a little time-consuming.
Step 1: Apply a sealer to the wood. Set aside to dry.
Step 2: Apply your first color – I used walnut. Again, let it dry.
Step 3: Apply the crackle. Don’t dry completely, but allow it to dry enough that it becomes tacky.
Step 4: Apply a second color of paint – I used coral. Within minutes you will see the cracks starting to appear. By the time the paint is dry, it looks fabulous.
Step 5: Apply a varnish.
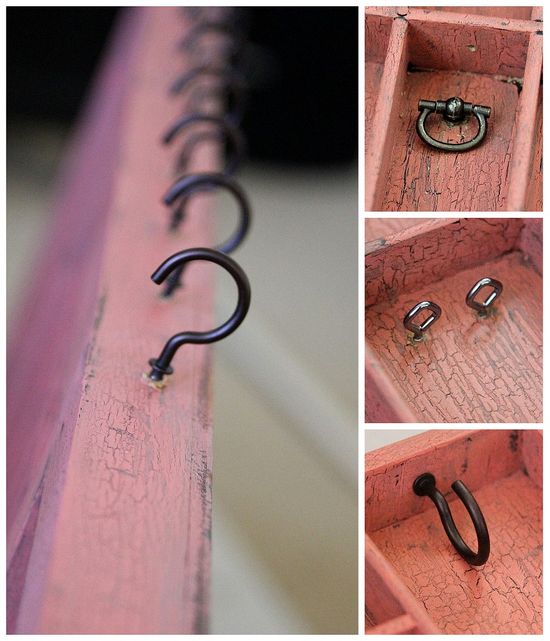
The final step is to attach hooks, rings, and eye-screws to hang your jewelry. I found most of these at the craft store.
Now you have a beautiful space to hang all of your jewelry.
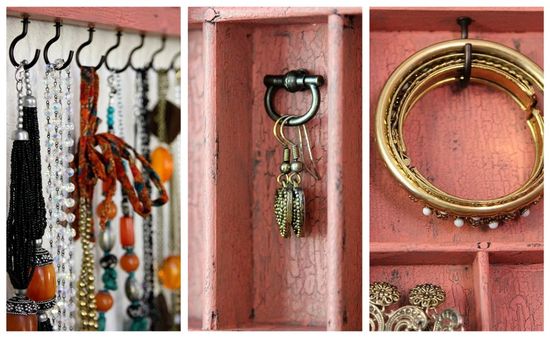
DIY jewelry organizers
You can see how I organized my large bangles too with a DIY bangle holder.

Please pin this post for later:
91 comments
At first thought, my husband, kidding…seriously though, I could do with a makeover of our patio set. It’s faded, some of the wood is falling off one of the seats and since we are about to move to the tropics for a year we need something functional that looks good for all of the outdoor breakfasts and BBQs that I hope we have!
Our junk drawer of children’s stuff (crayons, rings, hair elastics, random party favors, markers…) It is truly out of control in there.I try not to open it at all because things literally jump out at me.
You know what feels good? Saying nothing. I like everything just the way it is. It’s only taken me 19 years to get it there but if stretched I can only think that I still have to removed wallpaper from a closet upstairs, but hey…it’s in a closet, who cares?
Very cute project…my 20 something daughter would love that; that girl has some accessories.
Wish I could say “nothing”, like Barbara…LUCKY LADY!
Honestly, I am currently working in my craft/workspace room, and it could use some help…some new creative ways to store things to keep them readily accessible and yet not detract from the organization or decor of the room. I have a few odds and ends that I am inspired to use to create something, given the proper tools and a little crafting motivation. :)
Would love to win, so I can try the products…I have a collection of different glues/adhesives I have tried over the past couple of years…it grows each time I decide the last one didn’t live up to my expectations…so I hold onto it for “light duty” projects. It would be nice to find one I love and be able to ditch the rest.
PS…I am so in love with your new jewelry storage…I want one…but I don’t have any jewelry, so maybe I should make one for SugarPlum’s dress up jewels, instead! ;)
The one area that could use a Spring makeover in my home is the Living Room. I need more bright colors and fresh air now that the long MN winter is over.
mnsteph[at]gmail[dot]com
So pretty and practical!
My entry way needs a mega spring makeover!!! But, I have been looking for a jewelry organizer for a long time, and none of them were good enough. But this! this is just what I’ve been looking for! I want to make one of these, too!!
[email protected]
gahhhh you’ve inspired me to try something like this I have 4 dd’s and they all wear this schtuff so it would be perfect here in this house!!! Love the re invented organizer!!!
My entire craft room needs a makeover! Can’t wait to use your inspiration in my room somewhere!! :)
That is CRAZY AWESOME!!!
I have been searching HIGH and LOW for a tray like that … but every one I’ve found has been EXPENSIVE! (like $50+) and I don’t want to spend that much!!!
I’ve seen lots of these around, but I LOVE the various hooks and rings and things you used … SO GREAT!!!
~Bec @ http://www.littlelucylu.com
Oh my goodness, I LOVE this!!! I am jealous you found a typesetting tray so cheap! They are always so expensive when I find one.
wow! this is a great idea!
currently, our house is pretty much a disaster due to water damage and my master bed/bath is quarantined….so I can’t wait to do a huge spring cleaning job there..and of course the constant toy and children’s clothing rotation is on the list!
what a cool idea for jewelry storage!
My bedroom needs a spring makeover. We just got a dresser and I’m wanting to give the walls a new paint of coat, maybe a new color. Perhaps a new duvet cover…just freshen the room up to match the new furniture!
My office/craftroom/spare room is in desperate need of a makover! I even have hubby on board. We just aren’t sure where to start! So much to fit in to a small space.
WOW. I need to do this. Seriously, I have been searching for the perfect jewelry organizer. Now I know what to look out for. Absolutely stunning!
Emily
Deviantly Domesticated Team
http://stephaniehillberry.com
great job, love the pink! thanks so much for sharing on Craft Schooling Sunday, nice to see you!
Our Back Porch Needs a Spring Make Over! I need to paint and bring in some scrapbooking photo’s to brighten up the area. I like how you made the jewelry Organizer and it actually gave me idea’s on how I could possibly make some Springtime Frames (maybe). I’m not too talented but will give it a try.
Congratulations Julie, you are one of the winners of this giveaway. I will be emailing you shortly.
Congratulations Wendy, you are one of the winners of this giveaway. I will be emailing you shortly.
Really cool – love all the details like the crackle and the different hooks, eye screws and decorative rings you used- nice job!
saw this in Tip Junkie- SO Beautiful!!! The crackle is neat, and I’m totally lovin the “hardware” you chose :D
Thank you Shauna :)
Thank you so much.
its amazing..great cute effort :)
LOVE IT !!!
I completely agree, you absolutely NEED one :)
I totally need this!
Hi Barbara,
Congratulations, you just won an Elmer’s DIY Kit. I will email you shortly for your address.
Congratulations April, you just won an Elmers DIY kit.
Congratulations, you were one of the new winners of the Elmer’s DIY kit.
Oh my gosh, this is so adorable! I’m always so jealous when people find the absolute perfect thrifted item to make stuff with. I never have that kind of luck. What an absolutely adorable way to organize your jewelry!
Thank you so much. My 4yr old daughter loved it so much that she demanded one for her too, thank goodness the store had a second smaller type set tray and I was able to go back and pick that up for her. I'll be turning that one into a child friendly (aka more bangle hooks) shortly.
I LOVE this! What a beautiful piece to display all your beautiful pieces :)
This is amazing!!! So inventive — no wonder it won! Cannot say enough how great your creation is and how many people it will surely help! Thanks so much for sharing! — Social Media Manager of Pawngo, the pawn shop reimagined
My bathroom area needs a spring makeover. I need to pretty it up and get it organized. Also, I love that jewelry organizer.
supaflychikenpi2 AT gmail DOT com
You absolutely do need one :). My daughter also told me she needs one. I am making a smaller version for her, but with larger sections for bracelets and bangles instead of earrings
I need me one of these!! I love the tiny hooks, perfect for dangley earings :D
I just picked up all of the items for this great project! Even bought the type set tray for $15 on Craigslist today! Score!!!
I have two questions about this…
1. When you said you used a walnut paint, did you actually use a walnut finish or a walnut colored acrylic paint?
2. Did you need to sand the type set tray down before you applied the sealer (the first step you have listed)?
Thanks & love your blog!!
Yay. I'm so happy you are doing this. You have to share photos when it's finished.
Q1. I used a walnut colored acrylic paint.
Q2. I sanded it down just a little in the rough areas where pieces were sticking out etc, it was too hard (or maybe I was too lazy) to sand inside the small compartments though
Hi Brandi, I screwed all of the hooks in using a pair of long nose pliers so I didn't have to wind them using my fingers which was a little difficult to do in some of the smaller sections.
How about the hooks? Did you actually screw them in or use a hammer? I’m worried the hammer will bend or ruin them. I’ve tried screwing them in by hand but it’s really tough!
This is really cool! How I wish I had the patience to do some cute re-modelling like this. Not only can I flaunt the accessories I have, I can also make life easier for myself!
i love this idea. i am always trying to find cute ways to organize my jewelry. now i am trying to think of creative ideas on how to decorate my living room. my hubby and i just got our own apartment and it is my first one so i am so excited to decorate and paint and everything else. making picture frames and wall hangings from old stuff is one thing i would love to do.
I have too many!!! Number 1 is my closet!! Working on ORGANIZING it every day!
Thank you so much Amber. I've just started making one for my daughter too for all of her 'dress-up' jewelry.
Found this from Facebook and I LOVE this organizer!! I need something like this. I have a small standing jewelry armoire but there’s too much stuff in it. I’ve been thinking that I need some kind of wall organizer to pull out my daily “Cheaper” jewelry to make room in the armoire.
Great job on the jewelry organizer! Very inspiring. =)
I have 2 large stamps shelves like the one you have used in the organizer and never knew what to use them for…now I do. what a beautiful idea! I will be organizing my jewelery this weekend :) Thank you for the idea!
The top of my dresser is always a wreck. And the bedroom will be the first to be cleaned this spring!
Thanks for posting this, I made two of them recently but one was old and had a few cracks in it… now I know what to do in the future!
I am an 8th grade girl moving to a new house. There are a lot of things that I would like to do to my new room to sort of make it feel like my old room. I am very crafty and absolutely lovee this! I’m not sure if you’re still giving away the kits but if you are that would be awesome because I would like to make one! Let me know:)
Love it!!!
i absolutely love this idea. i found a type set tray this past weekend and am ready to get crafting. i cannot seem to find any hooks or eye screws that are not silver, and i have had no luck in finding rings. any suggestions?
Thank you so much for letting me know, I have reported them and noticed they have stolen posts from other craft and diy bloggers too.
I love this idea! Pinned it a while back. Today, when I was on Pinterest, I found a project I was interested in and went to the site. I saw several projects I was interested in on the side bar. And almost all of them I’d seen on Pinterest. Including yours. I know this seems odd to write and tell you about. But, your post was there, word for word. I’m sure there’s some type of copyright issue. But, mostly, I hated to see other people’s work stolen.
I hate a thief! I had a blog for a while and would have been really annoyed if someone did that to me. Here’s a link to the site so you can check it out. I promise, I’m not a spammer! http://interests11.blogspot.com/2012/03/diy-jewelry-organizer.html
I love it! So cute!
I am so excited to do this but just stopped in to a local antique mall and their typeset trays were $45!! Ugh! I’ll keep searching! Thank you for sharing!
this is very very cleaver going to start looking for boxes now to make for christmas
I got one of these for my Girlfriend…
And for the life of me I cannot find an easy way to screw in the eye hooks into the tiny compartments….
Any words of wisdom or ideas???
Hi Mike, the best way I found to do this is use a a small pair of pliers and put a lot of muscle behind screwing them in. I found it worked much easier to screw them into the back of the typeset tray as opposed to screwing them into the top of each little section. I hope that helps.
I’m amazed!! WOW! It’s gorgeous and pink.. I LOVE me some pink! I just thought I’d let you know I shared this here: http://www.vixenmade.com/2012/04/amazing-home-decor-makeovers.html
Such a neat idea! I’ll have to try this in a year or 2 when I move to another state and out of apartment living.
Hi! Love this idea & want to give it a try…how did you insert the hardware? Did you need to drill/hammer holes first? Thanks!!
oops, disregard that! I just found my answer in the comments =)
That is awesome! I definitely need a new way to store my jewelry. My closet needs a spring make over! Everything is so cluttered, and I don’t have anywhere to put my shoes other than the floor.
Hi Amy,
The basic hooks I found at Target, unfortunately I found that the larger home improvement stores had the basic silver and a little gold, but I wanted something a little different. Also, check out scrapbooking suppliers, they have some hooks that are perfect for hanging earrings, some have tiny screws in the back, others you just need a really great adhesive. I found that Aaron Brothers carried quite a good assortment.
where did you find the cute hooks in that color? where do you find the hook in general! lol
awesome! thanks!
I used eye screws to hang post earings. You can either screw them in to the top of the little compartment, or into the back. I found it easier to screw it into the back, pop the earing through the hole and pop the backing on it. Hope that helps.
How can you hang up post earings in this? I just made one of these but have no where to put my posts.
Hi! I love this idea – it’s just so beautiful and super for organization. I found a letterpress tray at a garage sale recently and I am in the process of making a jewelry organizer myself. I went to Home Depot today and found screw eyes and cup hooks. However, I couldn’t find anything close to the “decorative rings” you used on yours. I’ve tried looking them up online too, but haven’t had any luck. Where did you find yours? Thanks so much! :)
Thank you so much, unfortunately though I'm not selling them. I have only made them for myself and my daughter so far. Maybe I should look into this though :).
Hi Erika,
I found that the regular hardware stores didn't stock a variety of colors, or styles. I ended up purchasing the hooks from Target – they also had white at my store, and the other decorative rings were from Aaron Brothers (framing store) – they are scrapbooking supplies, some have tiny screws, others have adhesive on the back, just use an extra strong glue on those ones. Hope that helps. Good luck.
I would love to buy your jewelry organizer!! Are you selling any? I love it!!
Good luck Julie, hope you find the tray. I've come across a few at thrift and re-sale stores.
I love this & the color/crackle finish! I so need to make one for myself & my girls! Now to find the perfect tray! Thx for sharing!
my antique dresser with oval mirror
My bedroom
wow!! quite a bit of work, but great refurbishing..the result is worth it, and can host a considerable collection of jewelry!! love it :)
please have a look at my idea for a diy earring holder: http://whatscraftdoc.blogspot.co.uk/2013/04/party-or-casual-detachable-collars.html
Do you sell these?
Unfortunately no Courtney, although I've been asked a few times so maybe it's time to start considering it :).
Eye hooks are perfect for stud earings and they come in various sizes and lengths too. I found it was better to use longer ones with smaller eyes that way it wasn’t too fiddly trying to get the earings in and out of the small compartments.
Hi Tonya!
I love it! I have a tray my mom gave me before she passed away that I used for the little decorative what-nots but I am more geared to functionality now. How did you hang your stud earrings? Thanks
Sabre’
Hi Becca, thank you. I brushed it on. I wish I’d developed my addiction to spray paint back when I made this :).
Hey! It’s beautiful! Did you use spray coral paint? Or did you brush it on? Thanks!
What a wonderful design and it is beautiful to look at! Thank you for the inspiration.
Your creative project was a superstar in my round-up today! Thanks so much for the inspiration. Here it is if you want to check it out: 25 Creative Solutions to Necklace Organization.
Cheers!
Lauren
The Thinking Closet
My whole closet!
This looks fantastic! I wish I could do this in my home – my husband would kill me if I hung something on the wall in our bedroom :( Maybe in our next apartment I can have a walk-in closet, and I’ll definitely create something like this – and have a fainting couch too ;-)
Thanks you for sharing!
I really want to order an organizer!!
I wonder, how’d you go about hanging this on your wall?
Loved It